Late Saturday afternoon. The kettle has just boiled, and the autumn light is hitting that bare, beige expanse of wall behind your stove. You have a stack of glossy, peel-and-stick tiles resting on the counter. They smell faintly of fresh vinyl, printing ink, and Sunday-afternoon ambition. It is a quiet moment in a Canadian kitchen, the kind of stillness that begs for a small, satisfying project.
The packaging promises a weekend transformation. Just peel the backing, align the seams, and press firmly against the drywall. It feels like a brilliant loophole to rental living—a way to inject character and bright colour into a tired space without asking a landlord for permission. You envision the perfect kitchen, completely unaware of the chemical reality hiding beneath that waxy paper backing.
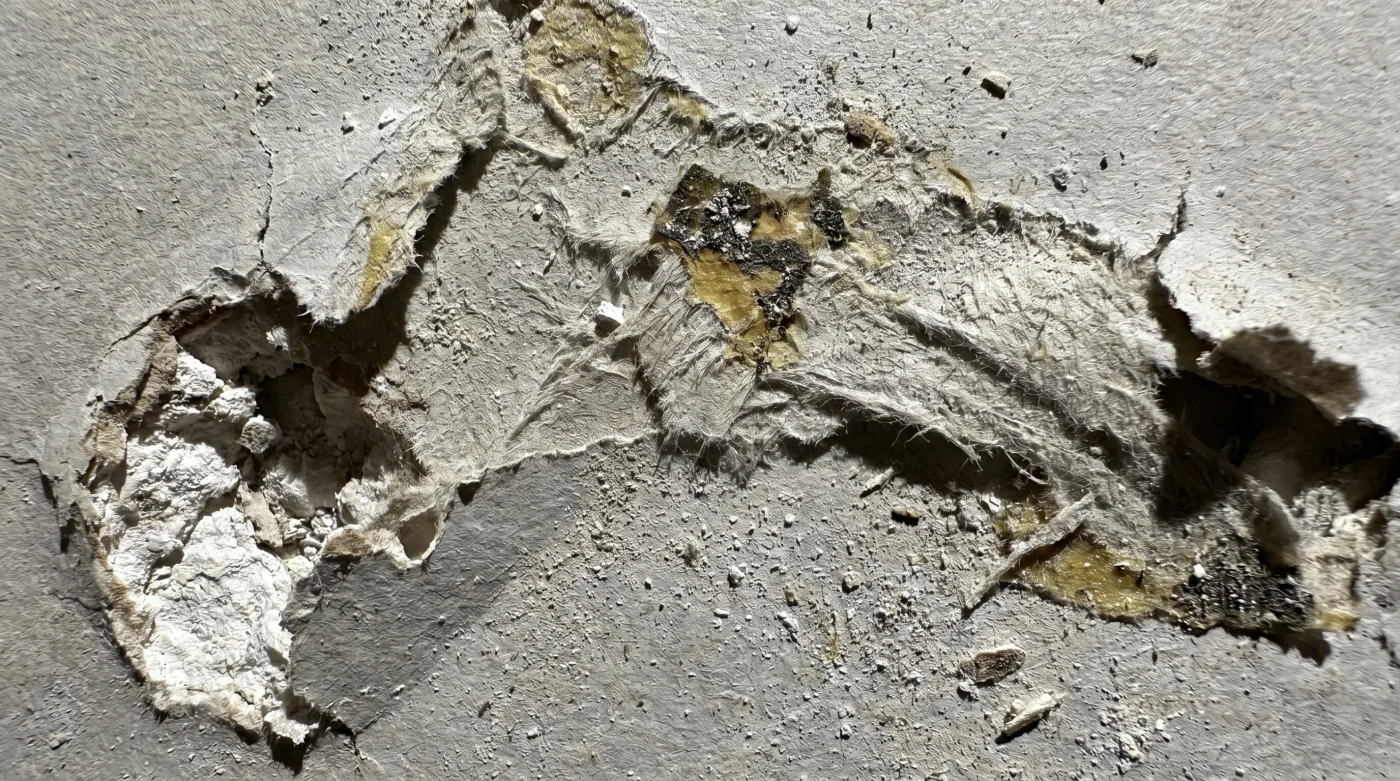
Here is the quiet truth about renter-friendly decor that home improvement aisles rarely advertise. The adhesives keeping those heavy, faux-ceramic squares suspended in mid-air are not gentle. They grip with the intensity of industrial construction mastic. When moving day arrives two years from now, peeling them off will sound like tearing thick cardboard, bringing the top layer of gypsum paper down in terrible, jagged strips.
Suddenly, your cheap weekend upgrade becomes a frantic patching job, requiring joint compound, sanding sponges, and perfectly matched paint. But a nearly invisible barrier changes this entire equation, turning a permanent, deposit-ruining mistake into a truly temporary triumph.
The Anatomy of a False Promise
Think of modern peel-and-stick backing like a microscopic bed of grappling hooks. It is designed to fight gravity, constant humidity from boiling pasta water, and fluctuating ambient temperatures. To survive this demanding environment, manufacturers rely on high-tack acrylic adhesives. These glues cure slowly over weeks, becoming increasingly stubborn the longer they sit on a wall.
The structural problem lies in the mating surface. Standard Canadian drywall is nothing but crushed chalky gypsum pressed between layers of heavy craft paper. When aggressive acrylic glue meets porous paper, the bond becomes structurally permanent. The adhesive does not fail under tension; the weak link is the fragile face of the drywall itself.
This is where a sheer painter’s tape grid becomes your quiet savior. Instead of attaching the tile directly to the wall, you are creating a sacrificial skin. It acts as a selective mediator—strong enough to hold the vinyl tile up, but designed chemically to release cleanly from latex paint. You aren’t just decorating; you are engineering a predictable, reversible system.
Clara Jenkins, a 34-year-old film set designer in Toronto, has spent a decade building elaborate architectural illusions that only need to exist for three weeks. “We use luxury vinyl peel-and-stick constantly on set,” she notes, carefully slicing a strip of green tape. “But we never let the adhesive touch the flat directly. We map the entire backsplash in two-inch, low-tack painter’s tape first. The tape takes the beating, so the architecture doesn’t have to.” This behind-the-scenes trick separates a professional installation from a costly amateur regret.
- Cedar decking costs plummet when buying off-season mill direct batches
- Pantry shelving wastes vertical space without tiered gravity dispensers
- P-trap pipe leaks stop when you abandon liquid thread sealants
- Drywall anchors fail because renters ignore the weight distribution logic
- Gas stoves face massive phase-out as retailers shift to induction
Adjustment Layers for Your Space
Not all tiles demand the exact same preparation. The weight of your chosen material, the finish of your walls, and the proximity to water change how this protective barrier needs to function. Tailoring your tape application ensures the tiles stay flat while remaining completely removable.
For the Heavy Faux-Stone User
If you are working with thicker, 3D-gel tiles, faux marble, or metal-finished squares, you need maximum surface contact. Instead of a sparse, open grid, run your tape in continuous, slightly overlapping horizontal strips. Create a full protective canvas across the drywall to distribute the heavier hanging weight evenly and prevent the corners from curling over time.
For the Flat Matte Renter
Matte paint is notoriously chalky and prone to peeling, even under the gentlest conditions. If your rental features cheap, flat builder’s paint, use a specialized delicate-surface tape—usually light purple or yellow. Press it on with the lightest touch possible, ensuring the tile adheres to the tape, not the fragile paint dust beneath it.
For the Splash-Zone Pragmatist
Those dealing with the high-moisture area directly behind a kitchen sink face a different challenge. Water actively wants to seep behind the tape and compromise the adhesive. Leave a microscopic gap at the very bottom edge where the wall meets the counter, sealing that specific seam with a tiny bead of removable silicone rather than tape, preventing water from wicking upward.
Building the Reversible Grid
Executing this method requires a methodical approach. Rushing the barrier layer compromises the entire finish, leaving you with lumpy tiles or exposed seams. Wash the wall thoroughly with a damp microfiber cloth and a drop of dish soap, then let it air dry completely for at least four hours.
You want to handle the tape lightly, smoothing it with the pads of your fingers rather than stretching it tightly across the wall. Stretching creates structural tension, and over a few months, tension inevitably leads to peeling.
- The Tape: High-quality, low-tack painter’s tape, exactly 1.88 inches wide for optimal surface area.
- The Grid Spacing: Lay vertical strips every 4 inches, intersecting with horizontal strips every 6 inches to catch the centre and edges of standard tiles.
- The Pressure: Use a dry felt squeegee to press the tape down. The friction warms and activates the gentle adhesive.
- The Environment: Keep the kitchen around 20 Celsius during application. Cold tape becomes rigid and refuses to bite into the wall.
Once the lattice is up and smoothed flat, apply your tile as normal, using the grid lines as a handy leveling guide. The aggressive acrylic glue will bite fiercely into the paper backing of the tape. Your deposit remains fiercely protected behind this simple, hidden geometric puzzle.
The Freedom of Temporary Choices
There is a distinct lightness that comes with knowing your living space can be entirely reset in a single afternoon. Renting often feels like living in someone else’s museum, where every nail hole is scrutinized and painfully negotiated with a property manager.
Mastering this small layer of physical intervention shifts the power dynamic in your favour. You are no longer crossing your fingers, blindly pressing glue to the wall, and hoping for the best. You control the entire lifecycle of your environment, from the quiet moment of inspiration to the chaotic day you finally hand back the keys.
The true luxury of a home is not the expensive materials hanging on the wall. It is the ability to change your mind without financial or emotional consequence. You buy yourself absolute freedom tomorrow by treating the architecture with a little empathy today.
“The best interior modifications don’t just consider how beautifully they go on; they plan ruthlessly for exactly how they will come off.”
| Method | Application Detail | Long-Term Result for You |
|---|---|---|
| Direct Application | High-tack acrylic bonds directly to porous gypsum paper. | Hours of scraping, torn drywall, and a lost rental deposit. |
| Full Tape Canvas | Heavy tiles are mounted to overlapping strips of low-tack tape. | Complete wall protection; peels off in solid, satisfying sheets. |
| Grid Tape Method | Lightweight tiles are anchored to a 4×6 inch painter’s tape lattice. | Zero damage upon removal; saves money on tape while maintaining grip. |
Rental Decor FAQ
Will the tape show through the seams of my tiles?
Not if you plan your layout carefully. If your tiles have transparent grout lines, use a tape colour that matches your wall, or ensure the tape strips sit flush behind the solid portions of the pattern.
How long can the tape stay on the wall before it becomes permanent?
High-quality painter’s tape is designed for clean removal up to 60 days in sunlight, but trapped beneath an opaque tile away from UV light, it remains pliable and safely removable for two to three years.
Can I use masking tape instead of painter’s tape?
Absolutely not. Traditional masking tape uses a rubber-based adhesive that dries out, calcifies, and fuses to the wall over time, creating a nightmare to scrape off.
What if my peel-and-stick tiles are already directly on the wall?
If they are already up, use a hairdryer on a medium heat setting to soften the acrylic glue before pulling slowly at a 45-degree angle. This minimizes, though may not entirely prevent, paper tearing.
Does this method work for rental wallpaper as well?
No. Wallpaper is too thin, and the tape lines will telegraph through the paper, creating visible ridges. This tape barrier technique is exclusively for rigid or thick vinyl tiles.