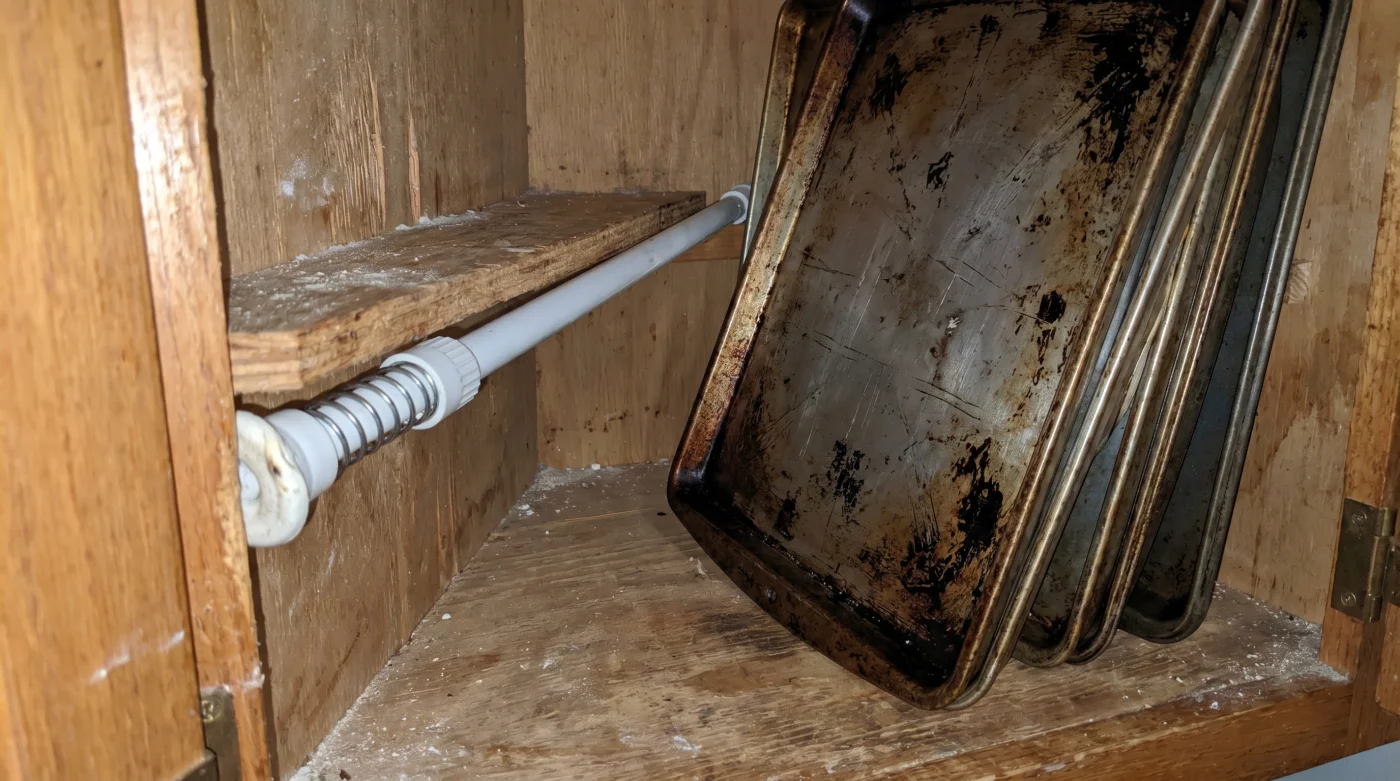
You know the sound. It is a sudden, chaotic clatter of metal sliding against metal that echoes through the kitchen just as you reach for the bottom roasting pan. You pull the heavy cabinet door open, and there it sits in the shadows: a precarious, disorganized tower of baking sheets, heavy cutting boards, and wire cooling racks, stacked carelessly like a collapsed deck of cards.
For years, you have accepted this horizontal piling as a necessary friction of domestic life. You try to pull just one thin sheet from the middle, but the entire heavy pile shifts, scraping against the white melamine shelves and fraying your patience before the oven has even hit 175 Celsius.
But look closer at that lower cabinet. Notice the dark, empty void hovering just above your nested pans. That stale, empty air is not a permanent flaw in your kitchen’s architecture; it is an invisible vault of vertical real estate waiting to be claimed.
The Vertical Filing System
Think about how an office handles sensitive paper. You do not stack reports in a single, heavy pile on your desk; you file them upright. Stacking flat kitchen tools horizontally wastes massive amounts of vertical space, turning gravity into a daily obstacle that fights against your cooking routine.
The physical relief happens the moment you rotate your perspective ninety degrees. By standing your flatware up, that frustrating, bottomless cavern transforms into a highly accessible library. The dead space above the horizontal stack suddenly becomes your primary storage mechanism.
Elias Thorne, a forty-two-year-old custom millworker operating out of a quiet workshop in Dartmouth, Nova Scotia, noticed this recurring friction. Clients were paying thousands of dollars for built-in wooden dividers, constantly complaining that without them, lower cabinets felt fundamentally broken and unusable for daily meal prep.
Elias realized that the expensive, rigid plywood dividers he was building were overcomplicating a simple physics problem. You just need boundaries, he often tells his apprentices, pointing out that spring-loaded tension rods create the exact same structural channels for a fraction of the cost, instantly introducing tactile organization into the smallest, most stubborn footprints.
- Sump pump floats jam when mineral deposits accumulate over winter
- Cedar lumber costs drop when sourcing directly from rural sawmills
- Drywall anchors fail because renters ignore the pilot hole rule
- Cast iron skillet rust vanishes using this basic household acid
- HVAC filter density ratings secretly choke residential furnace blower motors
Mapping Your New Topography
Not all flat items require the same breathing room. You can adjust the tension rod spacing to suit the specific rhythm of your daily cooking habits, shifting the boundaries as your kitchenware collection grows or changes over the years.
For the weekend baker: space the rods tightly, leaving just a couple of inches between them. This creates snug, dedicated slots for thin metal cookie sheets, wire cooling racks for your Nanaimo bars, and shallow muffin tins, preventing them from catching on one another when you pull them out.
For the daily prep cook: widen the channels. Heavy, wooden cutting boards and thick plastic prep mats need slightly more clearance to breathe. Storing these upright allows air to circulate around damp wooden boards, preserving the organic material and preventing long-term warping that ruins expensive butcher blocks.
For the frequent host: create a wide, sturdy section at the far edge of the cabinet. Large ceramic serving platters and heavy roasting trays can lean securely against the reinforced side wall, held safely upright by a tensioned boundary that stops them from tipping over.
The Quiet Mechanics of Installation
Converting your cabinet requires nothing more than a tape measure and a handful of inexpensive, short tension rods. Look for the small, sturdy variants typically used for narrow bathroom windows, ideally with rubberized feet that grip without scratching the wood.
Clear the space completely before you begin. Wipe down the shelf with a warm, damp cloth, letting the bare, clean surface dictate where your heaviest items naturally want to sit before you start measuring and installing the rods.
The process is a tactile exercise in trial and error. You will want to follow a few specific boundaries to ensure the rods do not slip when a heavy cast-iron pan brushes against them during a rushed dinner service.
- Measure the exact internal height of your shelf. Most standard lower cabinets sit around twelve to fourteen inches high; purchase rods that fit this specific compression range so they maintain strong internal tension.
- Group your items by thickness. Place your largest, heaviest cutting boards to one side, working your way down to the thinnest aluminum baking sheets on the opposite end.
- Install the first rod by twisting it until it feels firm against the top and bottom of the cabinet, then give it one extra quarter-turn. The rubber feet should press firmly into the surface without bowing the wood shelf above.
- Test the glide by sliding a baking sheet into the new slot. It should move in and out with absolute zero friction against the rod.
- Wipe the rubber feet with a damp cloth every six months to remove dust, ensuring they retain their sticky grip on the cabinet surface.
The tactical toolkit requires four to six short tension rods rated for at least ten pounds of lateral pressure. Remember to measure twice and twist once to ensure a firm, unyielding hold against the cabinet walls that will survive daily impact.
Reclaiming the Rhythm of the Kitchen
When you open a cabinet and slide out a single sheet pan in one smooth, silent motion, something profound shifts in your daily routine. The physical resistance of the room simply disappears, replaced by a quiet sense of order.
Kitchens are deeply personal workspaces. When your tools are stacked heavily against you, cooking feels like an exhausting chore before you have even chopped an onion. When you design for pure tactile accessibility, the room suddenly works alongside you, anticipating your needs.
It is a quiet, hidden change behind a closed door. Yet, this simple vertical reorientation proves that lasting peace of mind is rarely found in buying larger homes; it is almost always found in learning to see the space you already inhabit differently.
The best physical storage solutions do not simply give you more space; they actively remove the daily friction from your routine.
| Key Storage Method | Structural Detail | Added Value for You |
|---|---|---|
| Horizontal Stacking | Nesting varied sizes on top of one another | Requires lifting multiple heavy items to reach the bottom pan. |
| Custom Wood Dividers | Permanent, drilled plywood slots | Beautiful but rigid; cannot be resized if you buy thicker cutting boards. |
| Tension Rod Dividers | Spring-loaded adjustable vertical bars | Allows instant customization and re-spacing without tools or damage. |
Cabinet Organization FAQ
Are tension rods strong enough to hold heavy wooden cutting boards? Yes, provided you purchase rods rated for higher lateral tension and ensure the rubber feet are completely clean before twisting them tightly into place.
Will the rubber ends damage my painted cabinet interiors? High-quality rubber feet will not damage the paint. If you are concerned, place a small, thin silicone pad between the rod end and the cabinet wall for extra protection.
How many tension rods do I need for a standard cabinet? Typically, four to six rods are perfect for a standard twenty-four-inch wide cabinet, creating three to five distinct, spacious vertical sections.
Can I use this method for glass baking dishes? Glass dishes are generally too thick and heavy for narrow vertical slots. This method is specifically intended for flat items like metal sheets, wire racks, and cutting boards.
What if my cabinet shelves are adjustable and slightly loose? Tension rods apply upward and downward pressure. If your shelf sits loosely on pegs, you may need to secure the shelf first with small brackets so the pressure does not lift the shelf off its supports.